Force Control Calibration and Configuration User Guide
Recommended Reading
Background
As the force control function may be required in the subsequent phase of the project, the following pre-requisite steps shall be completed to ensure the normal availability of the force control function:
- Linearity parameter calibration;
- Force sensor zero position calibration;
- Dynamics identification; For “crs” robotic arm, only dynamics identification and force sensor zero position calibration are required.
Install the Narwhal software and set up the machine environment
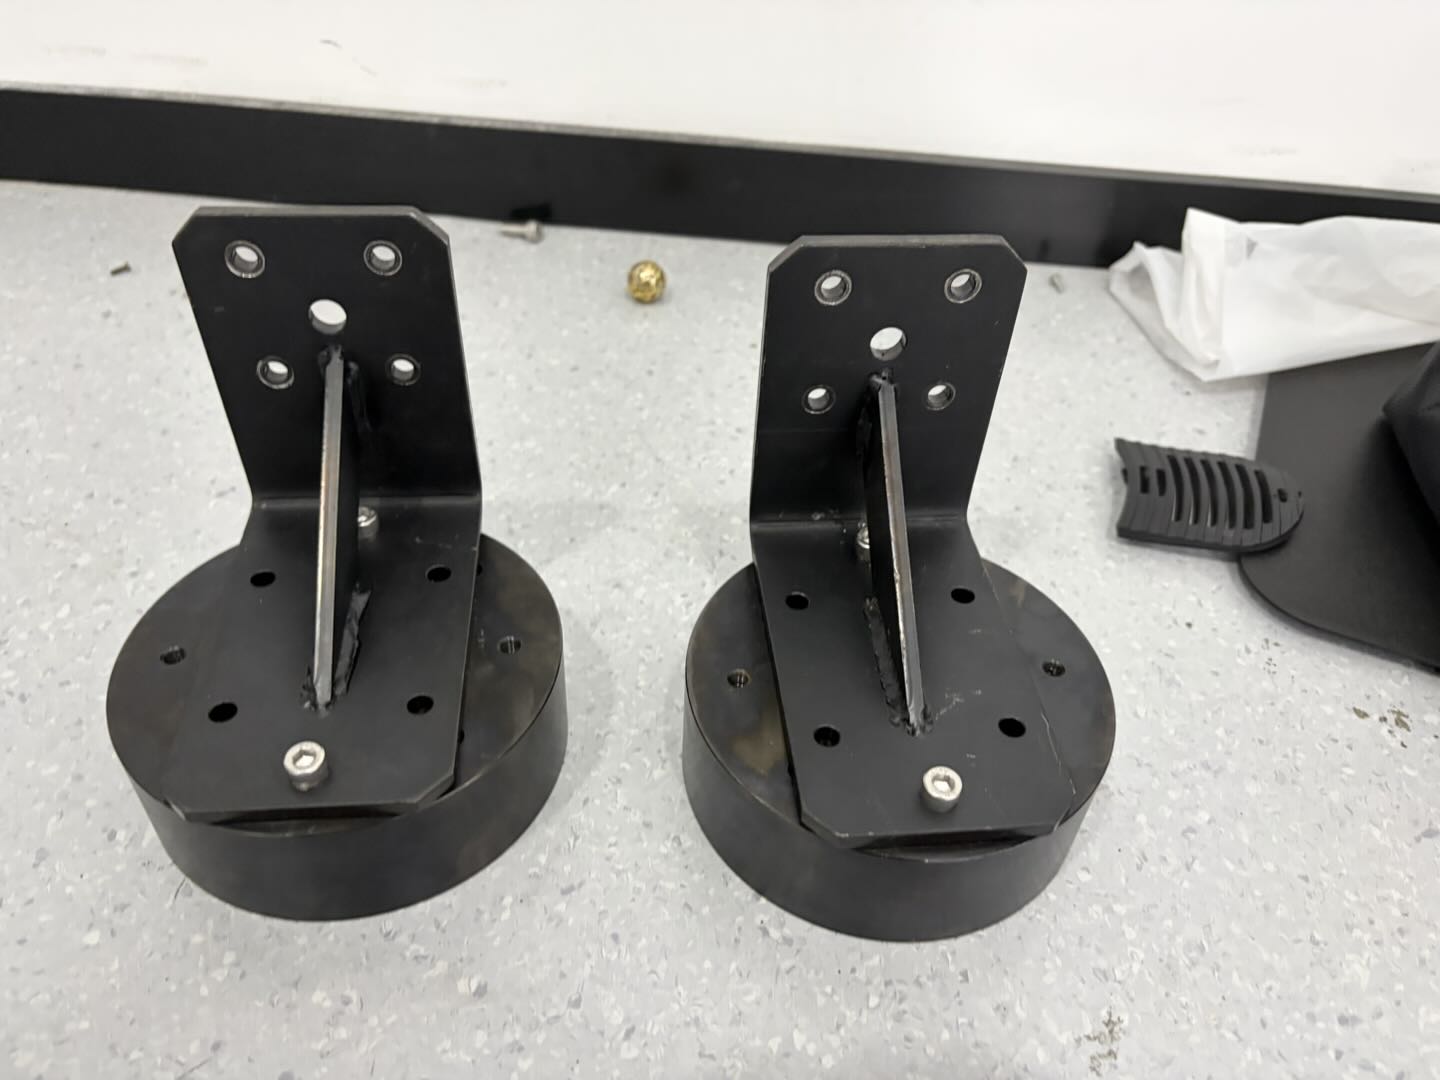
Tooling (eccentric load):
Supported Platforms
-
macOS (10.15+)
-
Ubuntu/Debian Linux (22.04 version recommended)
-
Other Linux distributions (Fedora / RHEL / Arch / openSUSE) are also supported
-
No Windows Yet
Narwhal Software and Installation:
tar zxvf narwhal-2.0.0.tar.gz
#Go to the folder narwhal-2.0.0/narwhal
cd narwhal-2.0.0/narwhal
PIP_INDEX="" ./install.sh
#install.sh will automatically od the following:
#Install system dependency (python3、venv、Qt required xcb lib)
#Under narwhal_env/ create Python virtual Environment
# start GUI
./run.sh
#Or manually:
source narwhal_env/bin/activate
narwhalAfter narwhal is installed, you need to place identify.tar.gz and genie_robot_description under the path /home/‘username’/Downloads
narwhal usage
Machine Connection Test Model and Machine Status Confirmation
-
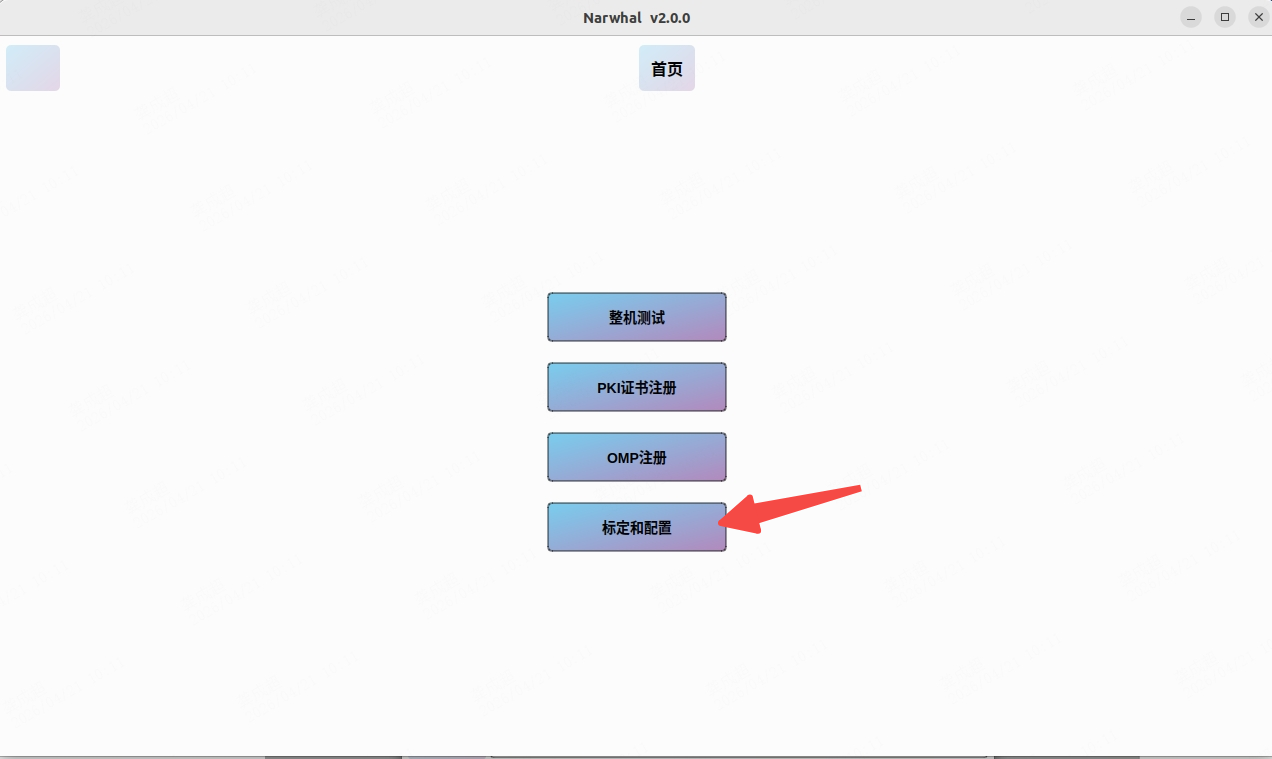
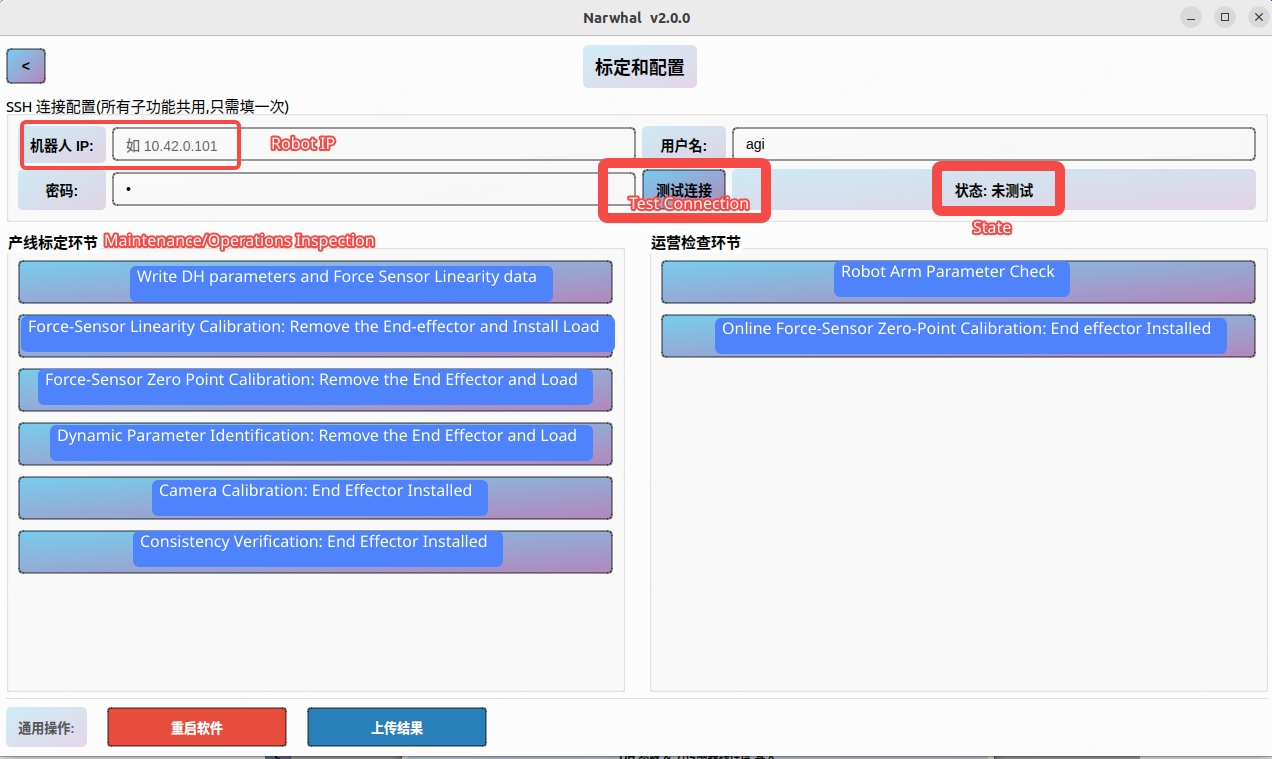
After startup, the screen shown in the above figure will appear, enter
10.42.1.101in the robot IP field(Connect to the robot via Ethernet Cable). -
Then click Test Connection to connect to the robot
-
Before performing force control, first confirm that the model matches the machine status, which can be viewed in
dds_view
source ~/app/dds_view_env.sh
dds_view- It is necessary to confirm the version of the app. Versions after 230 can directly implement force control without replacing the app package.
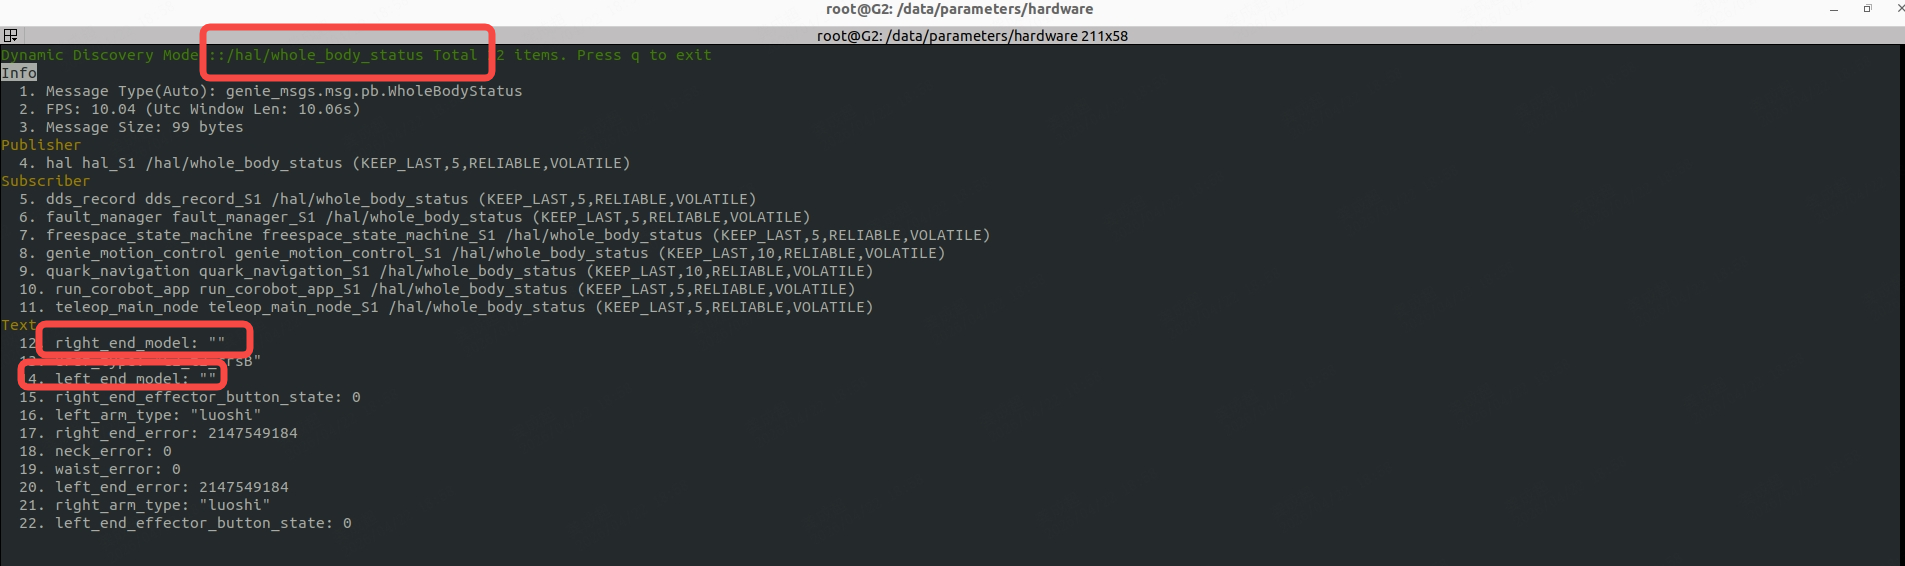
(For robots with “crs” arm, start from this step, and the whole robot needs to be at zero position)
- Since the machine is not equipped with an end effector at this point, the content inside the ” should be empty. If it is not empty, you can modify it via the following script: select to create a new configuration, set the machine as G2, select the manipulator type according to the machine model (the test machine is G2_t2_crsB), set the end effector type to AUTO, and restart the service after successful settings to make the configuration take effect.
python /home/agi/app/share/genie_robot_description/scripts/swappable_modules.pyRestart the service
restartForce Sensor Linearity Calibration (With Eccentric Load Installed)
Note: The cross-section of the tool shall face the floor when the robot in zero position.
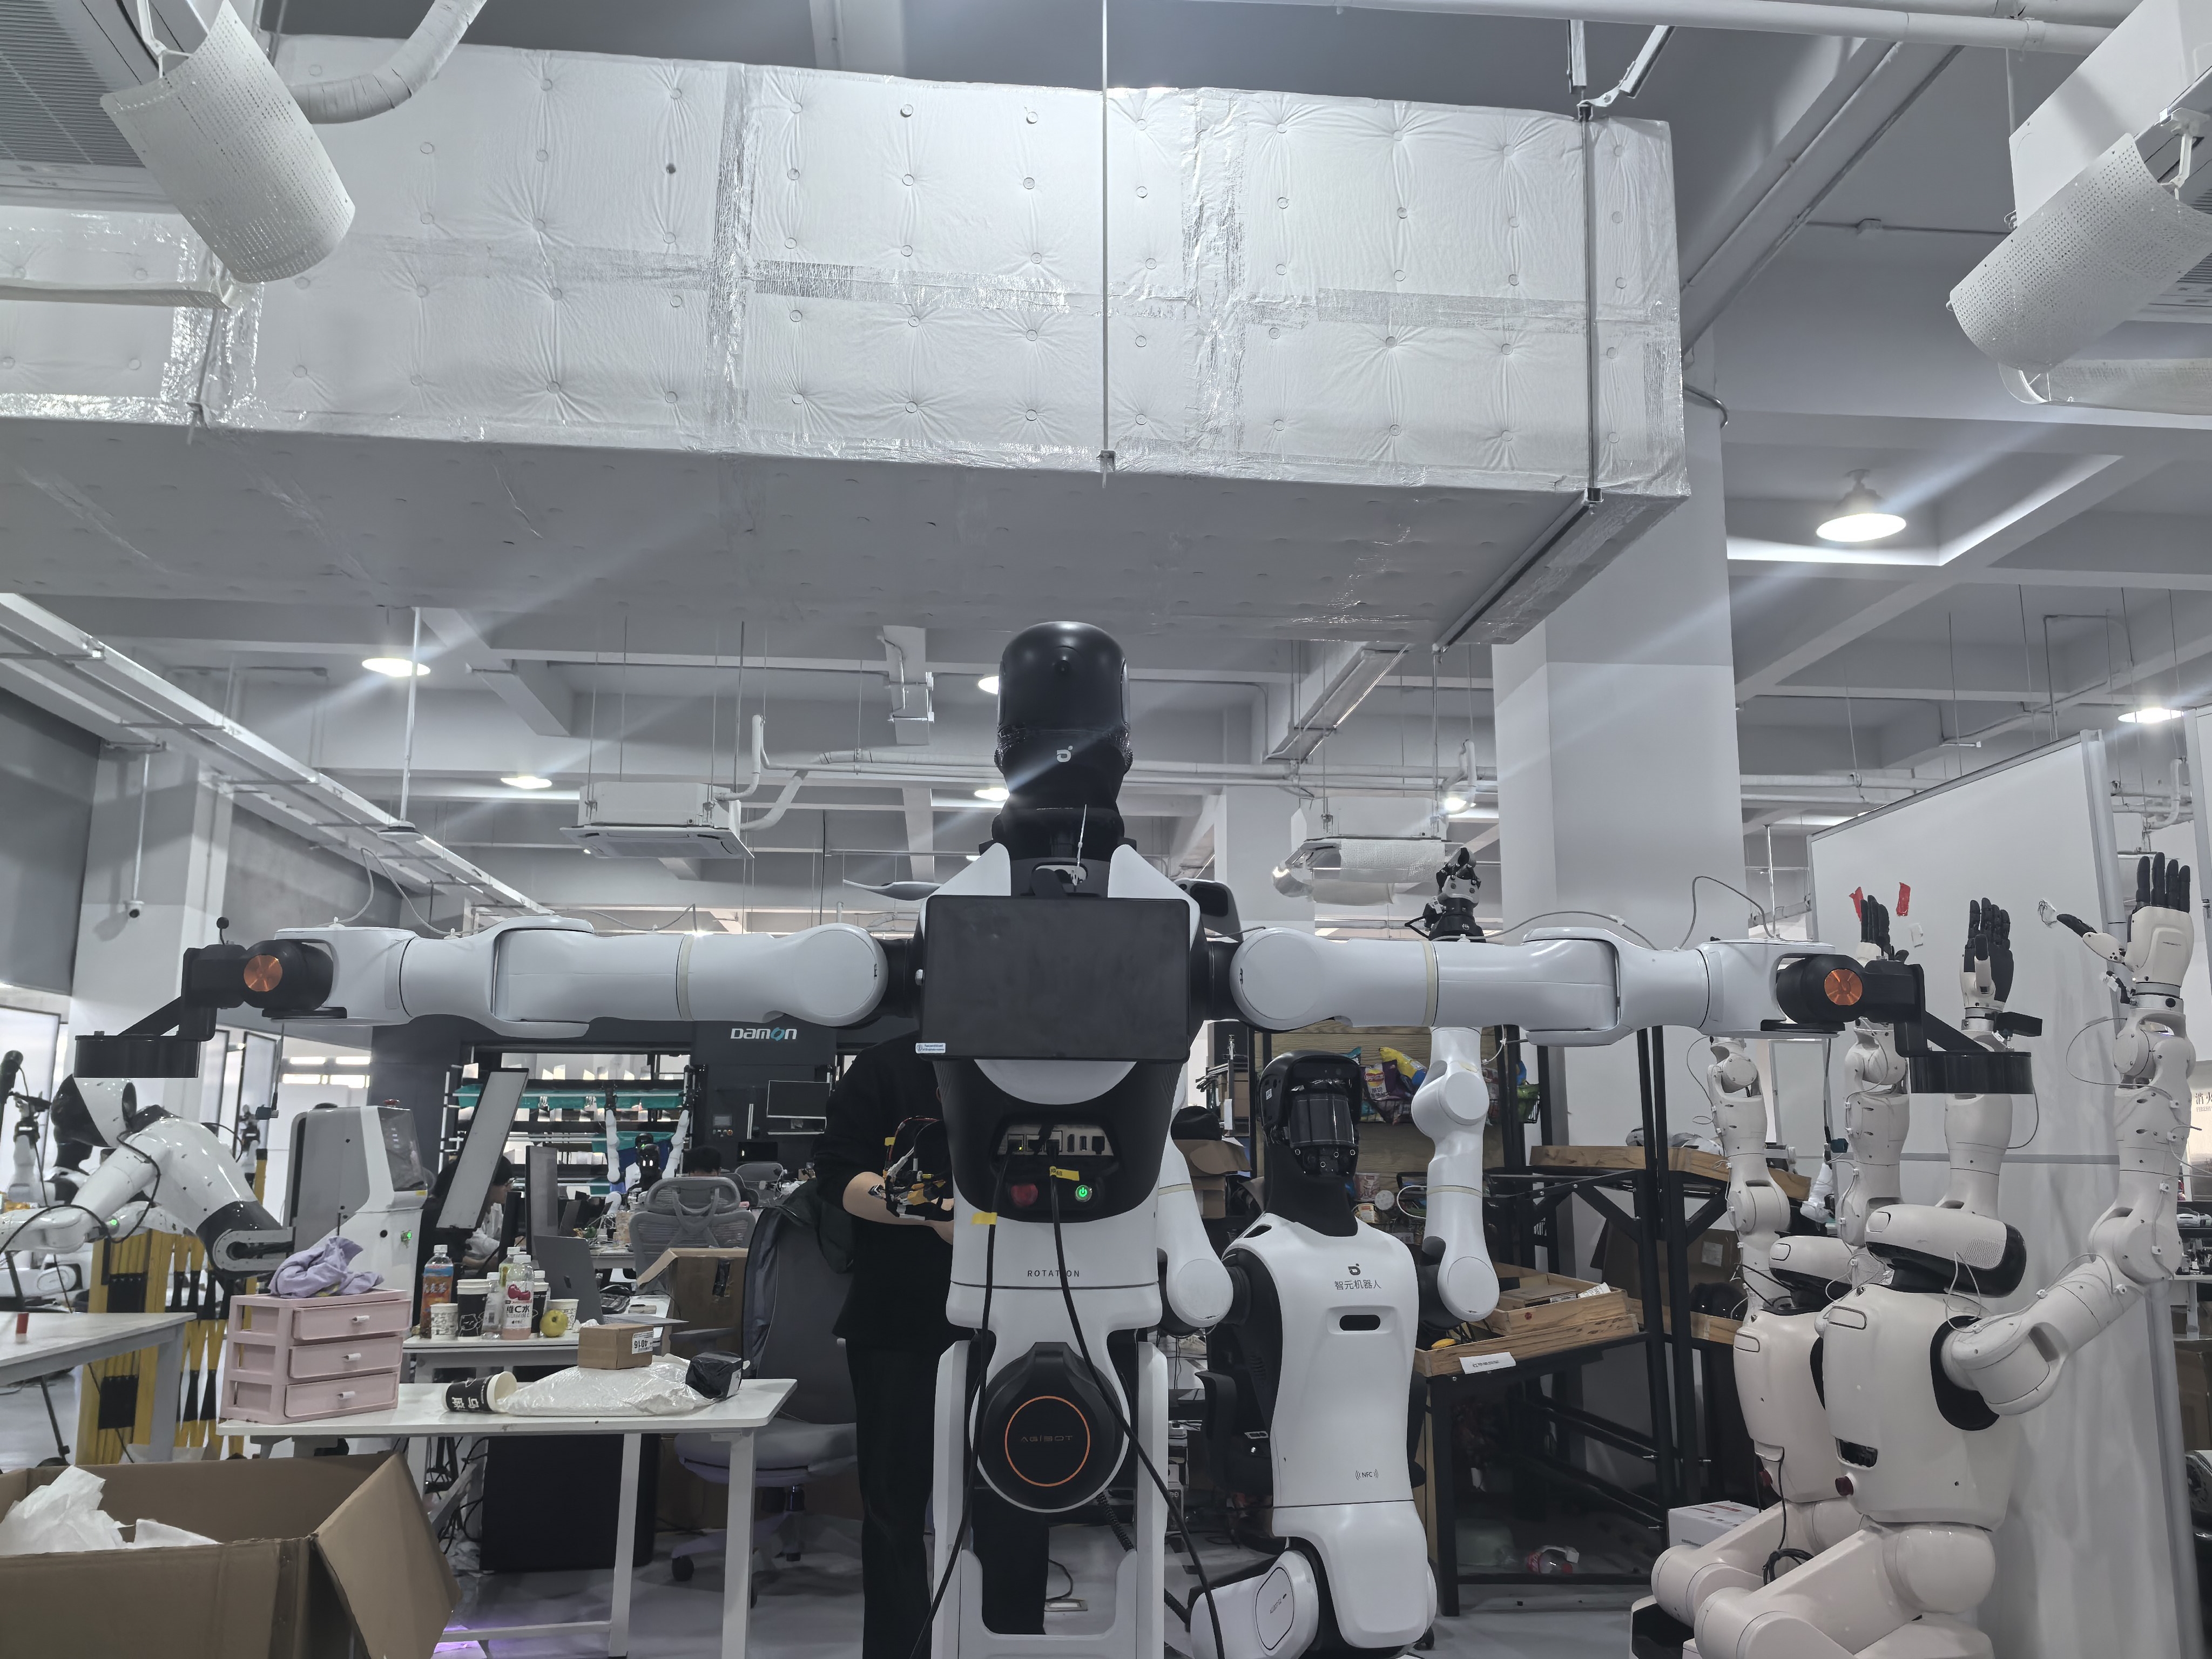
PS: Each robotic arm only needs to be calibrated once, and the calibration needs to be redone when switching the arm.
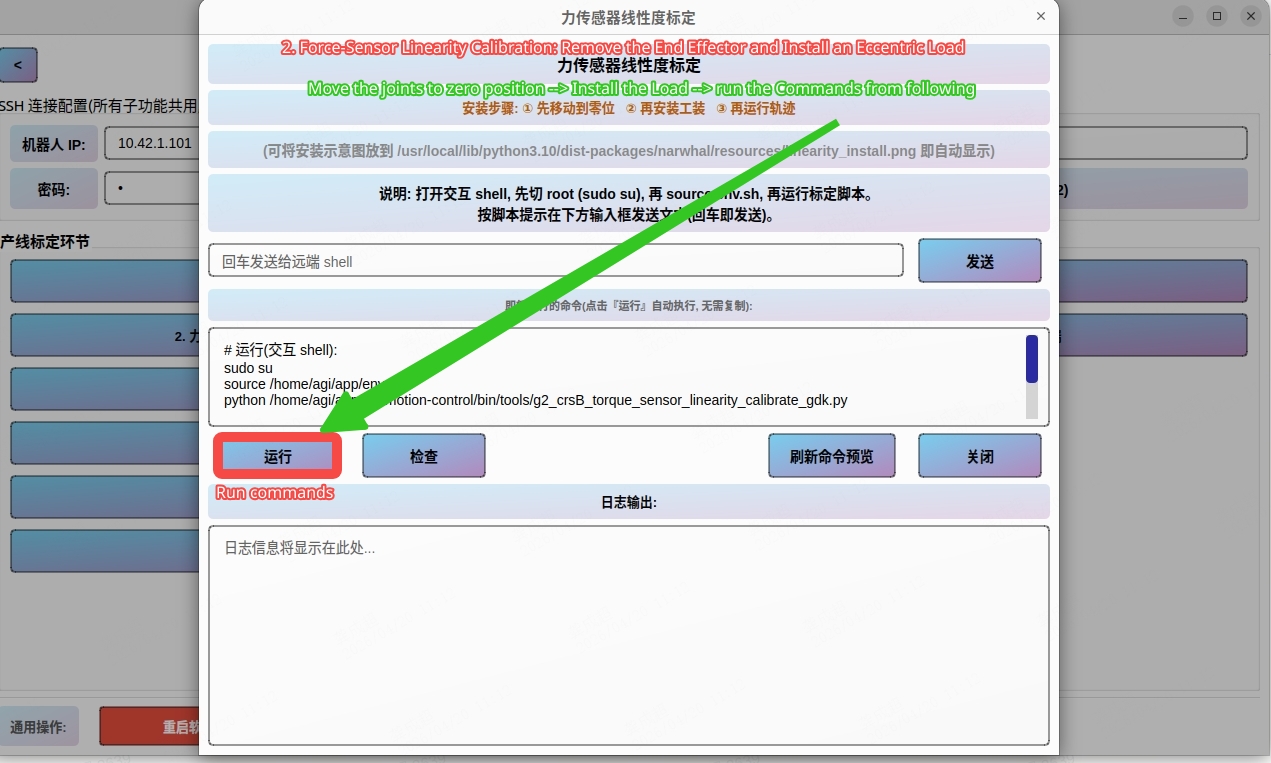
-
First, manually adjust the robotic arm to the zero position; the waist motor does not need adjustment, as it will automatically return to the zero position during calibration.
-
An eccentric load needs to be installed at the end of the dual-arm, and it shall be ensured that the load is firmly installed without shaking.
-
Execute the running instruction and click the send button as prompted, then the robot’s arms will start to move. During this process, ensure that the area within 2 meters around the robot is clear of any obstacles. The calibration of the two arms takes about 4-5 minutes in total, and a prompt of successful calibration will appear once it is completed. After successful calibration, **the overall reasonable linearity result should be within 60-140**. Minor fluctuations above or below this range are acceptable, but the overall distribution should be relatively even.
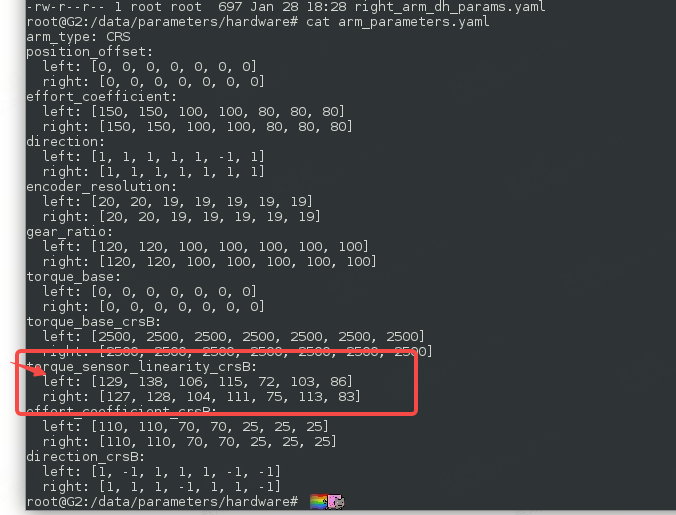
- Complete the check for the result
/data/parameters/hardware/arm_parameters.yaml. If calibration fails, all parameters in the red box will be 100, or there will be no arm_parameters. yaml file in this directory. A successful calibration is shown in the following figure:
- Complete the check for the result
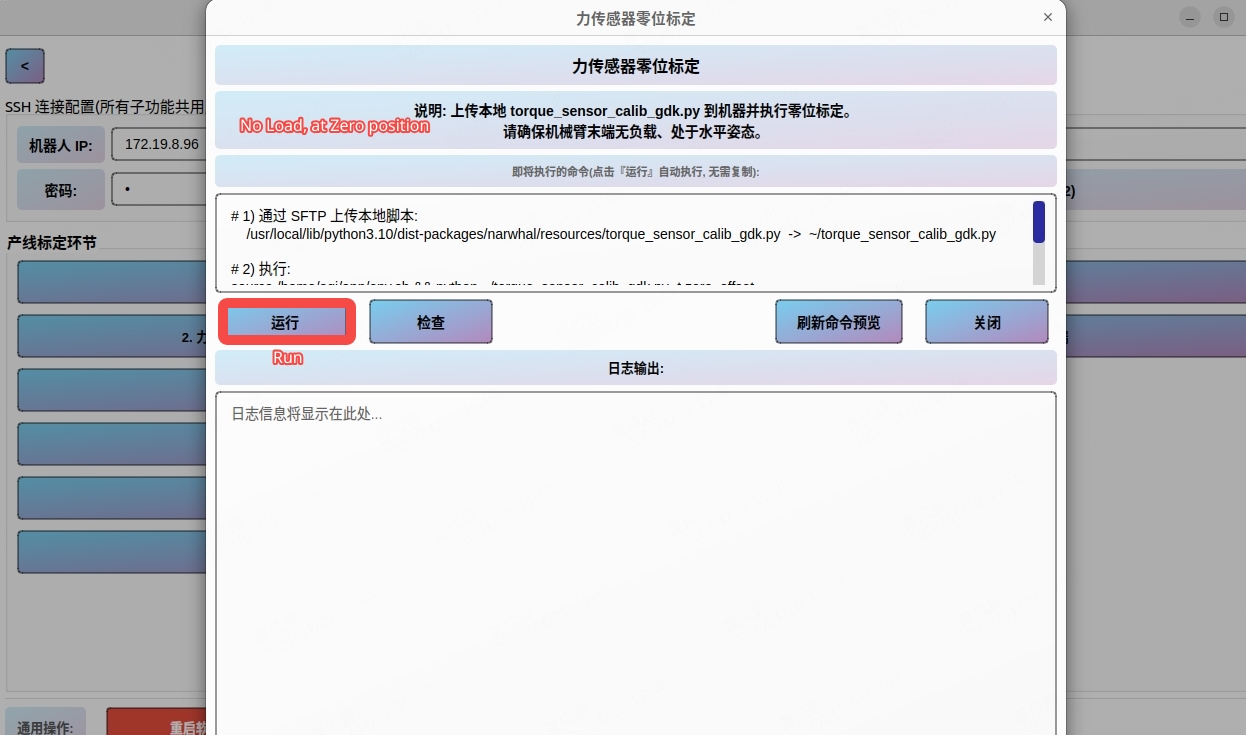
Force sensor zero-torque calibration (no load, no end-effector, no flange)
(For robots with “crs” arm, start from this step, and the whole robot needs to be at zero position)
-
Remove the eccentric load from the robotic arm to ensure that no gripper, flange or load is installed at the end effector
-
First click to restart the software, then restart the service
-
Click to run, wait for the output result, and the calibration success will be displayed in about 30 seconds
-
Check calibration result 1, The figure below shows the result after successful calibration; if the calibration fails or the parameters are not written properly, the parameter of this field will be fixed at 2500. If the log indicates that the calibration is not passed, please refer to Item C in the Q&A.
“crs” Arm only checks the values of hal/joint_state and effort in dds_view. dds_view confirms that all effort parameters in the red box should be within ±1
```Shell
cd /home/agi/app
source env.sh
dds_view
/hal/joint_state
```
Identify pipeline
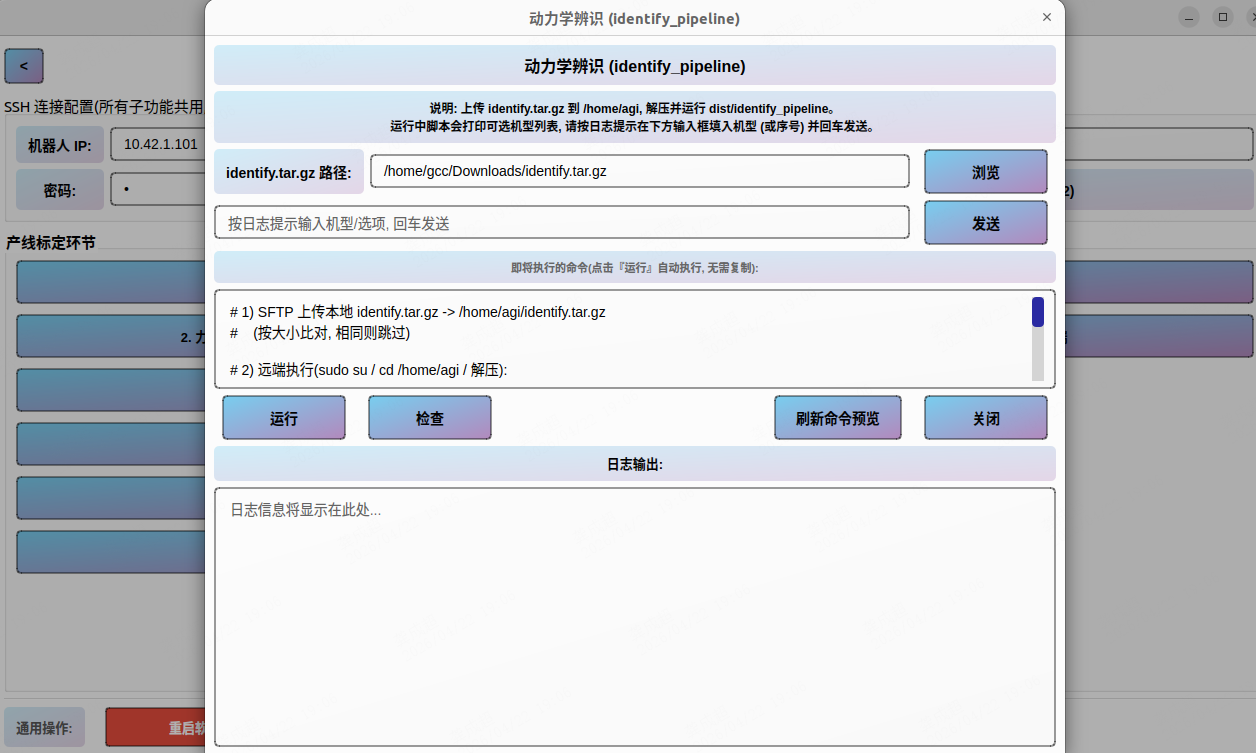
-
First click to restart the software(Red button on left buttom), and keep the area within 2 meters around the machine clear
-
Click to run, and the machine will record the action for about 170 seconds. After the recording is completed, you need to select the machine model.
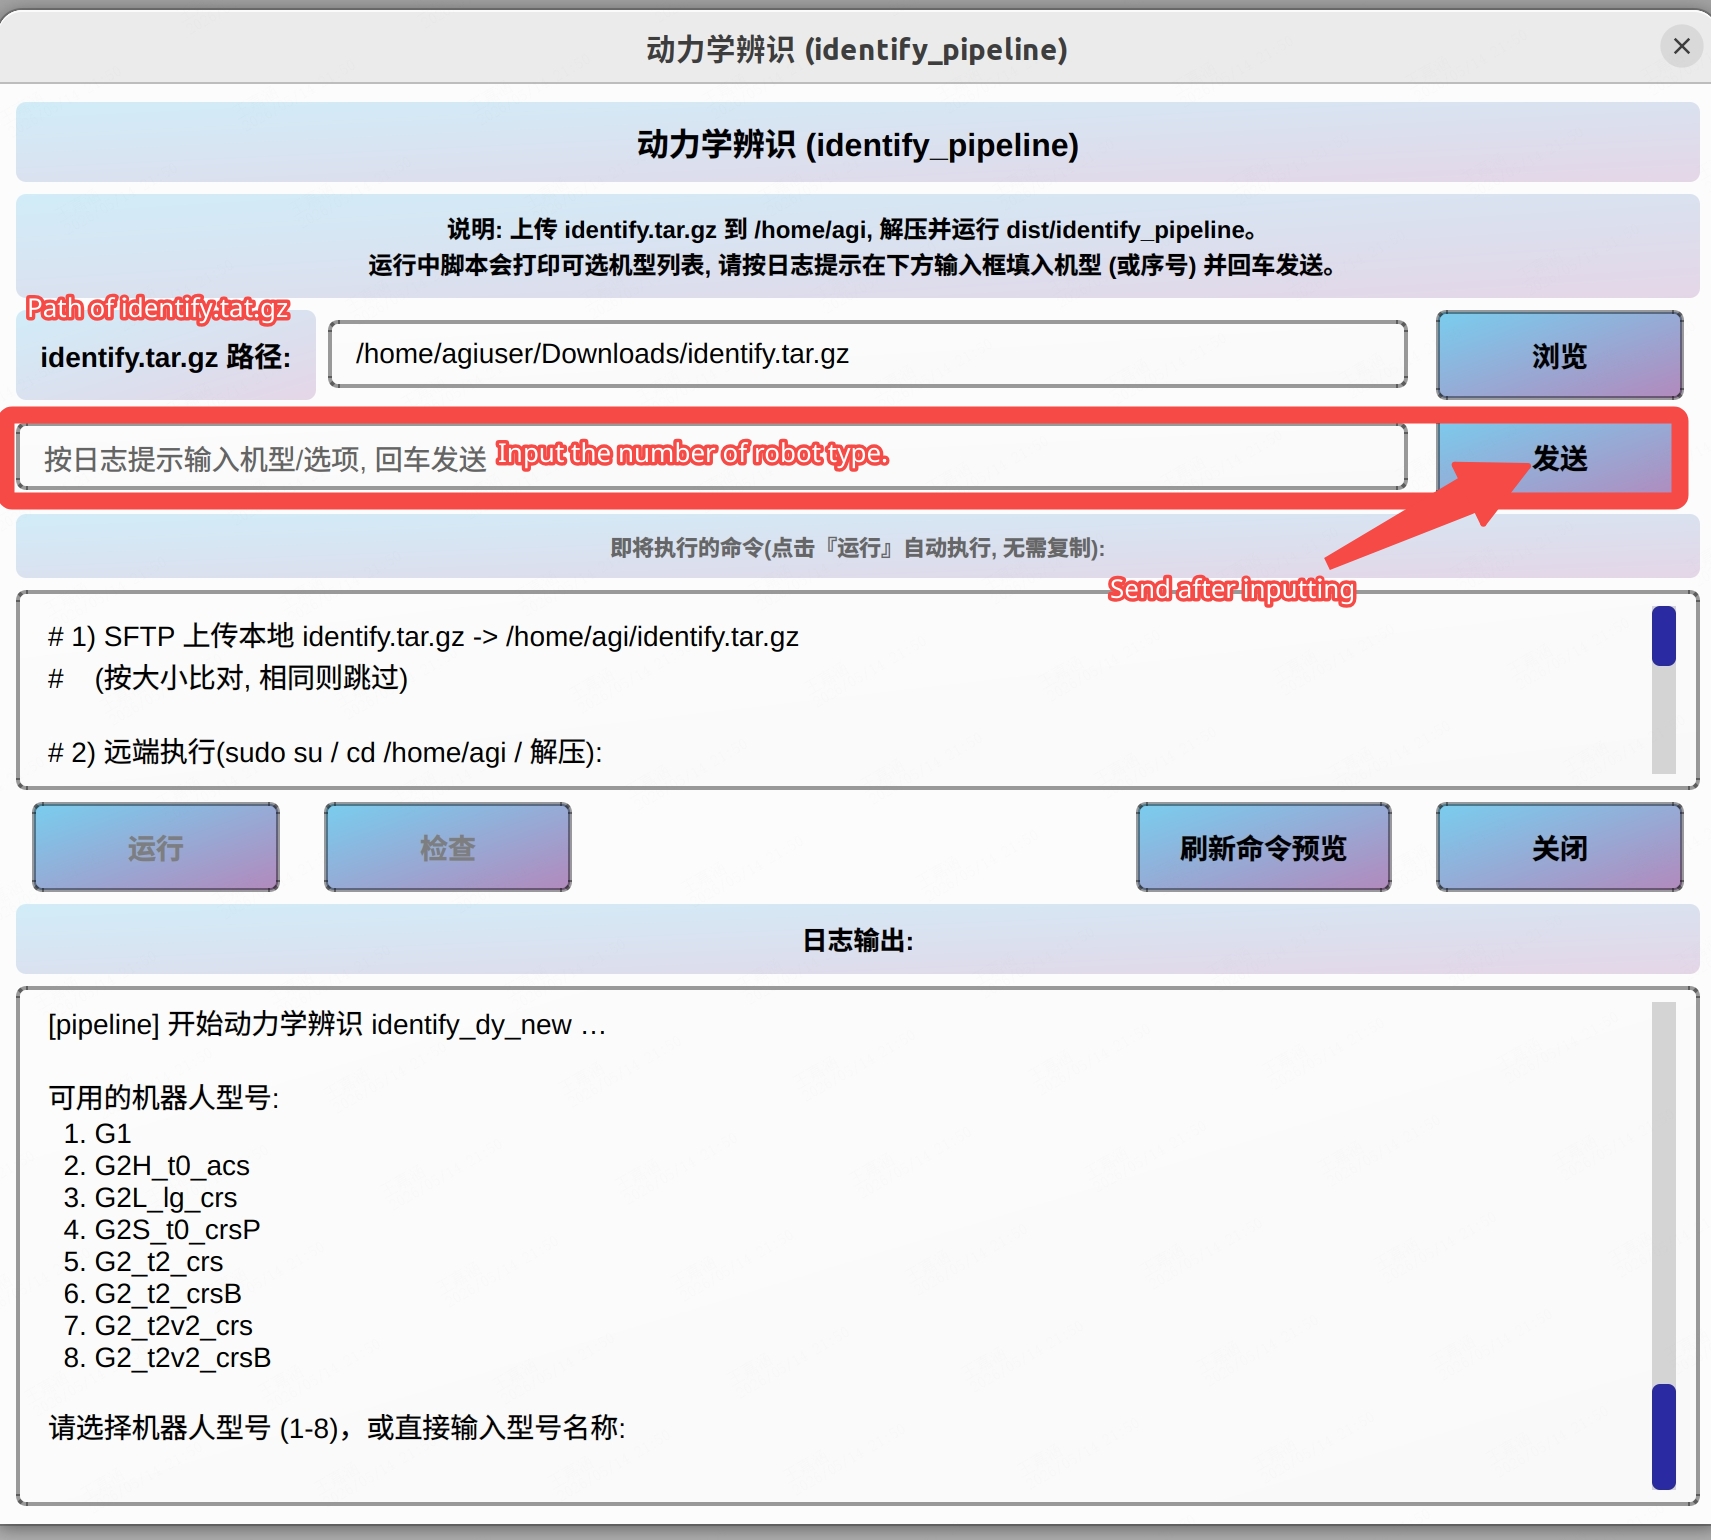
- Please ensure that the selected device model matches the actual machine, after identification is completed, an identify folder will be generated in the
/data/parameters/directory, ande\_tauin the overall result printed in the log shall be less than 1

Q and A
-
A missing identify.tar.gz error is reported during dynamic identification.
identify.tar.gzPut the file into the path /home/‘username’/Downloads as prompted, and do not
and use decompression
-
Force sensor zero calibration failed
-
Check
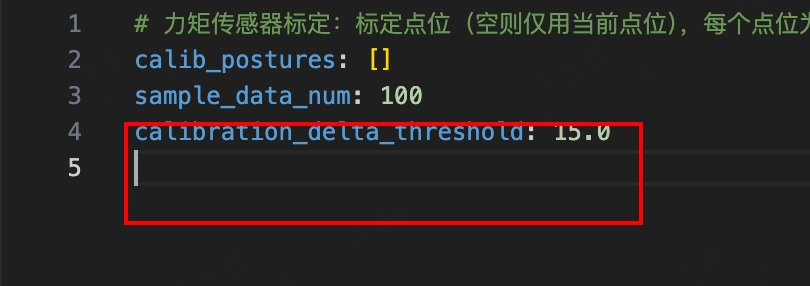
/home/agi/app/bin/motion-control/bin/logs/wbc_****. log``whether the robotic arm exceeds the threshold. The current threshold is 10, which will be relaxed to 15 in subsequent versions. If the value on the customer’s machine exceeds 10, you need to manually adjust it to 15, restart the service after modification, and then recheck. -
vim /home/agi/app/bin/motion-control/configuration/robot/G2_t2_crsB/torque_sensor_calib_config/default.yaml
-
After clicking “Run”, the log gets stuck at
waiting for motion response timeoutCause: The main program has not been fully started, or the DDS discovery is incomplete.
Processing:
「Restart the Software」
Wait for 15–30 seconds (do not retry immediately)
Run again
-
Error code
mapping values are not allowed herewhen read AIDCause:
The PTY echo of ssh_execmixed the commands into the YAML content.Action: Automatically fixed (switched to
awkfor extraction). If errors still occur, manually fill in the AID from the nameplate on the back of the device in the AID field. -
After installing the new version, the “Calibration and Configuration” button is not visible in the GUI.
Cause: The wheel in the venv is an old version.
Solution: Re-run./install. sh (it will now automatically uninstall the old version, clear the cache, and perform a fresh installation).
Stuck at a certain step for more than 1 hour
All script executions are subject to a maximum time limit of 60 minutes. After a timeout, the message[!] Timeout interrupted will be displayed in the log.
Procedure: Check if the robot is frozen → restart the software if necessary → retry.
-
If the dynamics identification result e_tau > 1, perform the following steps
1. Delete the app and decompress it again
2. Delete /home/agi/identity and identity.tar.gz
3. Delete the /data/parameters/identity folder
Read Next
Products
G2 Replace End Effector